Category Archives: Crafts

Soap making 101

Standard

This post is dedicated to my awesome granola friends who taught me how to make soap on a Saturday night!!! And because of a request from one of them, this blog will be mostly pictures with little writing……

Ingredients: safflower oil, extra light olive oil, canola oil, shortening, borax, glycerine, lye, sugar, goats milk and we added grapefruit essential oil for some yummy smell!

Let’s start:

20120311-214522.jpg
Ingredients: check

20120311-214600.jpg
All oils and shortening go into a pan to melt…

20120311-214801.jpg
Goats milk, measuring carefully….

20120311-214843.jpg
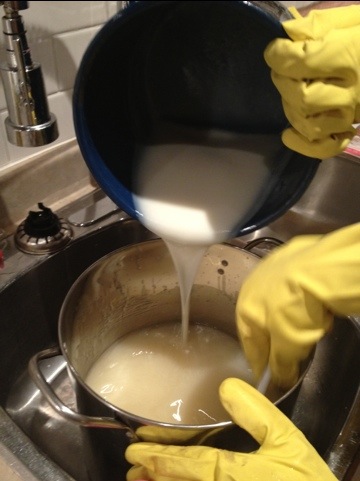
The goat milk heads into a pan that is set in cold water. The lye will be added in next, very slowly, to ensure that the temperature stays below 27degrees Fahrenheit . Notice the finger pointing – this is an important step!!

20120311-215036.jpg
One must protect themselves from the Nasty lye!

20120311-215114.jpg
Again, careful measuring….

20120311-215157.jpg
And mix!

20120311-215230.jpg
In the meantime, the oils have slowly melted…

20120311-215319.jpg
And the lye has dissolved into the goats milk.

20120311-215403.jpg
Time to get the molds ready. They are lined tightly with wax paper.

20120311-215452.jpg
Now’s the perfect chance to say hi to the kitty, hi kitty!!!

20120311-215545.jpg
Serious stuff now, we are going to mix the melted oils with the goats milk/lye! This is the same time that we add the borax, glycerine, sugar and essential oils.

20120311-215721.jpg
Adding and stirring.

20120311-215756.jpg
Borax in!

20120311-215936.jpg
Once Everything is mixed, you must blend it together in a mixer. This was working really well for us and was very creamy and thick once it was done, like the consistency of hand soap!

20120311-220220.jpg
Now pouring it into the molds….

20120311-220310.jpg
And smoothing it out…

20120311-220336.jpg
Looks perfect!!!

Now, fast forward 24 hours….

20120311-220412.jpg
Of course I have to include one picture of the kid!!! He’s with a snowman that lived for three hours. Gotta love temps of 11 degrees!!!

20120311-220526.jpg
Ready to start cutting. How? Using a cleverly designed apparatus that you feed the soap through and you are able to cut even slices. Here are some pictures!

20120311-220713.jpg
A gorgeous slice…

20120311-220739.jpg
Perfect!! (by the way, we added some dried marigold leaves for texture…..looks professional, wouldn’t you agree?)

20120311-220851.jpg
Finished product: over 30 bars of homemade goats milk soap. It will be ready in 6 weeks!

What Would Ma Ingalls Do?

Standard

I have two sick kids at home. One has pneumonia and the other, double ear infections. They were pretty sick but now with the medication kicking in, they are on their way to recovery. This is, of course exactly what I want but with the symptoms lessening, it means their demands, arguments and grumpiness are increasing. On days like these, stuck in the house with two tired grumpy children, I wonder what Ma Ingalls would do.

I don’t know much about Caroline Ingalls but I’m sure that she wouldn’t have let her kids stay all day in their pyjamas. She probably wouldn’t have had cotton swabs or construction paper. She wouldn’t  have had citrus juice to make a treat.

God bless you Mrs. Ingalls. I don’t know how you did it!

Here’s what we did today:

Read some more of The Long Winter

(How long can humans survive on potatoes and brown bread, just asking!)

Then made some easy to eat, practically guilt-free treats

(Citrus Jellies thanks to Every Day Food from Martha Stewart)

Here’s the recipe:

2 cups of orange or grapefruit juice ( I used a mix)

1/2 cup sugar

2 envelopes of gelatin

pour 1/2 cup of juice into a bowl. Sprinkle gelatin over and allow to dissolve.

Pour remaining juice into a pan with the sugar. Bring to a boil just to dissolve sugar. Take off heat and stir in the softened gelatin. Stir to dissolve.

Pour into an 8 x 8 baking pan. Cover with plastic wrap and refrigerate for at least 1 hour.

Cut and serve. Then enjoy.

And did some crafting

(This project comes thanks to Busybee Kids Crafts)

crafting supplies

my example to show the boys

Zeke's snowflakes

Cedric's snowflakes....man?

Hat knitting

Standard

So our wonderful mother (Hi Mom!)  gave me a great birthday present when I turned 29 last year: two skeins of “Pure Sheep Wool” from Topsy Farms on Amherst Island in Ontario.

I had big plans for them, which promptly got forgotten when I started knitting Christmas presents for my family.

But a couple of weeks ago I decided I needed a new hat to get me through the next half of the winter.

Using this pattern from Knitty, I made this hat:

Sassy, no?

Last Minute Valentine’s? Uh – uh.

Standard

Every major holiday finds me scrambling at the last minute to finish up different crafts and gifts. Whether it’s cookie baking at Christmas or cardmaking at Easter time, I’m always completing projects at the last minute.

Not this year.

It is one week to Valentine’s Day and our projects are in full swing.

This year, we are making these cards from Disney Family Fun for classmates. We are making this project  again from Disney Family Fun for teachers/daycare providers and these cookies  from Martha Stewart for everyone. After last night’s before bed craft session, here’s what we have accomplished.


Tonight, it was a cookie-making spree. All cookies for my son’s school friends are done. I need to make a batch for my other son’s daycare friends.

See it can be done.

Projects can be accomplished by deadline. (Bear with me, I’m trying to convince myself!)

Keep reading to see how successful we really are.

Ahh Martha.

Standard

So a couple of months ago I decided to paint our ensuite bathroom. Desperately needed because I hated the khaki green colour (next, our bedroom – also khaki green). Instead? a neutral beige called  whisper bluff. I like to whisper that when I say it and really focus on the ‘f’ in bluff. It drives my husband crazy. Do it….whisper…bluffffff….

But you know when you paint a room, you need new wall hangings. I am el cheapo and am always trying to find an inexpensive way to decorate. Isn’t everyone?

So I turned to this lovely lady, Martha Stewart to see what she could inspire me with.

Turns out, she has LOTS of ideas!!! Sister 2 bought me this book for my birthday and it is FILLED with easy, do it yourself crafts and sewing. So I did it. I did it myself. And here’s the proof.

I tackled this project:

20120203-194536.jpg

In this picture, Martha (because I truly believe that Martha does everything), embroidered some placemats – very cool looking. So I thought, I’ll do some embroidery and hang it! Easy, right?
TOTALLY!!!

Materials used:
– dollar store embroidery thread
– curtain material (neutral in colour and left over from a previous craft project)
– some embroidery stretchy wooden things (I’m sure there’s a name for these)
– tracing paper and pen (lent to me, this is the cheapest way to go)
– frames for Ikea (4 frames for $10)

So, Martha gives you  a cd that you can print off all the templates in the book. So I printed those off, used the tracing paper and pen, and started stitching:

20120203-195126.jpg
(I love crafting while eating chips and watching grey’s anatomy, don’t you?)

Here are the pieces when I was done stitching:

20120203-195259.jpg

Then I simply threw them into some frames:

20120203-195332.jpg

Hung them on the wall:

20120203-195405.jpg

(like the colour? remember…whisper blufff……)


Here’s a close up:

20120203-195431.jpg

Presto!!! All done. I quite like it. Total time for craft, maybe 3 hours. Total cost (keeping on mind I already had some material and borrowed others) $20 tops.

Now, what else should I try Martha? Hmmmm……

A weekend single-parenting….

Standard

This weekend found my husband on a ski-doo trip with the boys and me alone with our 2 year old. Hmmm…. What to do?
Hit up a museum with family!!

We headed to the Museum of Nature in Ottawa. I worried a bit about bringing a toddler to the museum, but here is some proof that is was enjoyed by all:

20120129-195320.jpg

-woah! Dinosaurs!

20120129-195401.jpg

– checking out some interactive stuff with his cousin

20120129-195447.jpg

– pumping water is hard work!!

20120129-195623.jpg

– Future Captain Feathersword (click here if you have no clue who that is)

Verdict? Would totally do that again. I love it when outings work out, don’t you??

And to finish off the day, a stop into Chapters saw this:

20120129-200104.jpg

I really had no clue that Darth was in town!!

At 8:30, when baby was asleep and I was on the couch with some chips (best snack ever!!), I managed to finish this knitting project for a baby shower gift.

20120129-200338.jpg

Like it? Super cute hat. The patter for it is from this book, More last minute knitted gifts, which is full of super cute patterns. Perfect for those nights by yourself…..

Saturday Night in Toledo, Ohio

Standard

Saturday night in Toledo, Ohio is like…well…it was nothing like our Saturday here in Valleyfield.

Our day began with french toast and tropical smoothies.

It moved on to the outdoors where, thanks to our driveway clearer, there was a good-size hill begging to be climbed. We spent a while making a pretty good sliding track.

Back indoors for free play and Mark Bittman inspired fried rice – so good – heavy on the veggies. Roasted red peppers, broccoli, bok choy, peas and scallions!

Quiet time found me on the couch knitting up the solution to a major outdoor issue – mittens slipping off. I spent most of our time outside fixing our youngest son’s mittens which kept falling off. Now, I’m sure that this type of outerwear has a specific name but we’re calling them “mitten holders”. They are probably called cuffs or fingerless mittens. You just pull them up over your child’s mittens onto their coat. When we lived in the James Bay region, a woman from the village knit a pair for my husband. He loves them. We use that pair still for our eldest son. So, I basically improvised today’s pair. I looked through a pattern book I have from my mother for inspiration.

If you’d like to create a pair for your mitten-losing child, here’s what you do:

Cast on 40 stitches. Divide onto three double-pointed needles (12 – 16 -12). Knit two rows in ribbing (K1, P1). Then, knit straight until the desired length (These were 4in from cast on edge). Then, you can create the checkerboard pattern (or not). Then, for the ribbing, *knit 2 tog, k2, repeat from * on each needle (9st per needle). Cont in ribbing K1, P1 until desired length (These were 2 1/2 in), cast off. (These would fit children age 2 to 6)

These cuffs are so simple to make. They take less than a couple of hours and end a million emotional breakdowns (from both me and my son)

After quiet time, it was back outside. My youngest wore his one mitten holder and it worked. Unfortunately, the other mitten fell off almost constantly. We continued  sliding down our hill having a great time.

Inside again for hot chocolate and Charlie and the Chocolate Factory.

Dinner was mushroom crostini, penne with cherry tomatoes and olives and this fabulous banana bread. Peanut Butter Banana Bread with Peanut Butter glaze. I was worried when I cut it that it would be dry but it wasn’t. The only change I made to the recipe was to replace part of the white flour with whole wheat and add chocolate chips. The glaze wasn’t very glaze-y but it was delicious.

Now, the kids are in bed. The day is technically over except for a mitten holder to finish.

I love weekends like these. Today was so much fun it was almost like we passed a week in one day – not exactly how John Denver meant it – but probably what he would have preferred.

I suggest you all take a walk down memory lane and spend some time rediscovering John Denver this evening just like I am.